A Real VPN Kill Switch
forcing specific traffic through a VPN at the router level, with a rule that fails closed instead of quietly leaking your real IP.
if you’ve got any workload that should always exit through a VPN — a download client, anything privacy-sensitive — don’t rely on a per-host firewall alias, and don’t rely on an in-container VPN client alone. give it its own network segment and enforce the routing structurally.
this is the pattern to reach for. i came to it after finding a half-finished attempt at exactly this sitting in my own router config from an earlier me — WireGuard server disabled, gateway bound to the wrong interface, an alias that resolved to my entire LAN instead of the one host it was supposed to cover. it never actually worked, and worse, if i’d flipped it on as-is it would’ve either routed nothing or routed everything. quietly.
that’s the failure mode this pattern is built to avoid.
one honest caveat: i don’t run the full version yet. it needs a dedicated network segment — a managed switch port, ideally a spare router-capable box — and i don’t have either to spare. the stopgap i actually run puts the same fail-closed logic one layer down, in a gateway container’s iptables instead of the firewall — that’s wiring up a vpn-gated *arr stack. this page is the pattern as it should be built once the hardware’s there; the container version is what covers the gap until then.
the core idea
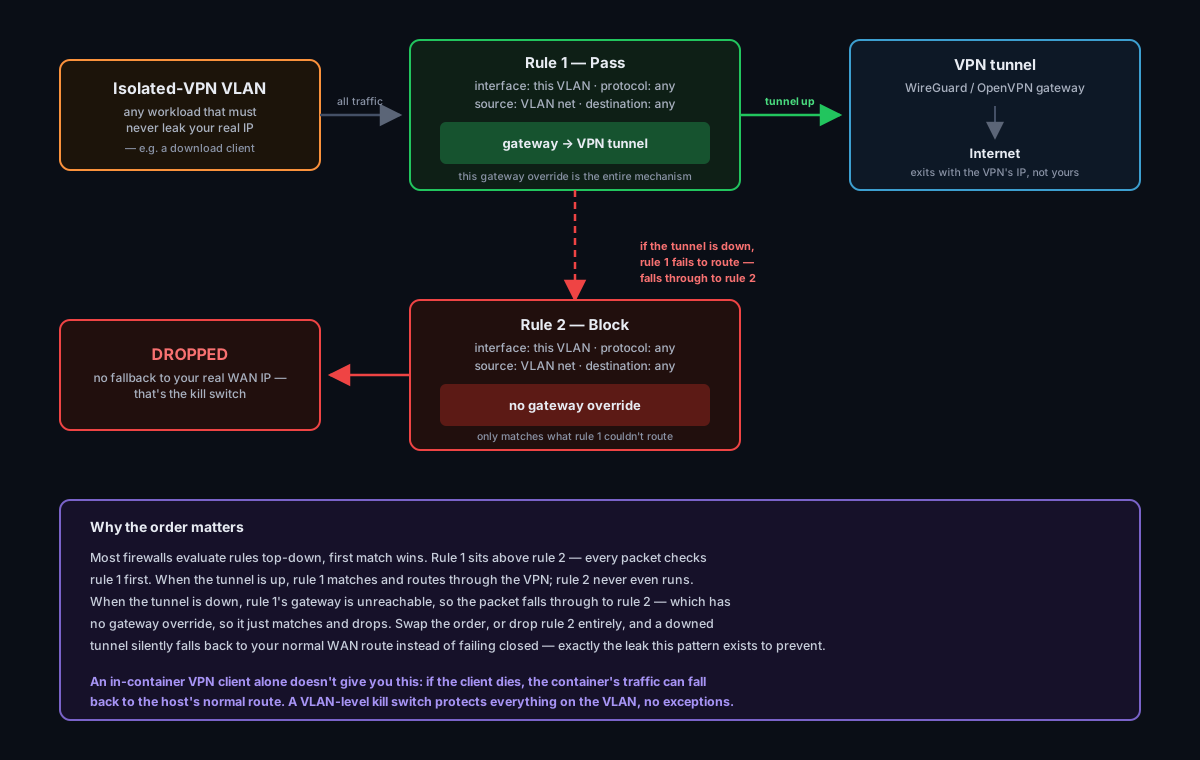
two firewall rules, in order, on whatever network the VPN-bound traffic lives on:
| # | action | source | gateway | why |
|---|---|---|---|---|
| 1 | pass | this network | VPN gateway | forces matching traffic through the tunnel instead of the default route |
| 2 | block | this network | (none) | catches anything rule 1 couldn’t route — i.e. the VPN is down — and drops it |
rule order is the whole mechanism. firewalls evaluate top-down, first match wins. if the kill-switch rule isn’t directly below the force-route rule, or lives on a different interface, traffic can leak your real IP the moment the tunnel drops.
setting up the tunnel
most of what breaks here is a half-checked field, not a hard problem. worth going through the WireGuard side field by field rather than trusting defaults.
the server instance:
- enable both the server instance and the peer — two separate toggles, and it’s completely possible to wire everything else up correctly and leave the peer sitting quietly disabled. nothing in most firewall UIs flags this for you.
- public key should auto-derive from the private key the moment you save. if the field comes back empty, the private key itself is bad — stop and re-pull it from your provider’s config export, don’t keep debugging downstream.
- MTU — WireGuard-over-a-commercial-VPN generally wants something a little under the standard 1500 (1420 is a common provider default) to leave room for the tunnel’s own overhead. use whatever your provider’s exported config specifies rather than guessing at a number.
- tunnel address and DNS servers — both come straight from your provider’s config export, not something you invent.
- disable routes, if your firewall offers the option — routing is handled by the firewall rules further down, not by WireGuard auto-injecting its own. leaving this unchecked can quietly create a second, conflicting path.
- the gateway field on the WireGuard server itself is not the same thing as your firewall’s top-level gateway entry (below). easy to conflate — I did, briefly.
the peer:
- public key — verify it still matches your current provider export. providers rotate server keys more often than you’d expect, and a stale one fails silently instead of throwing an obvious error.
- preshared key — leave blank unless your provider’s export explicitly includes one. most commercial WireGuard configs don’t.
- allowed IPs —
0.0.0.0/0(plus the IPv6 equivalent if you’re routing v6) for a full-tunnel setup — everything that reaches this peer goes through it. - keepalive interval — 25 seconds is the standard value, and it exists specifically to keep NAT mappings alive on both ends. don’t disable it to save packets, it costs far more in silently-dropped-then-reconnected tunnels than it saves in bandwidth.
the interface itself — this is where my original attempt actually broke: assign the WireGuard instance as its own dedicated interface, separate from the client-facing network. the firewall’s top-level gateway entry needs to point at this interface, not at the network the VPN-bound devices live on. bind it to the wrong side and the gateway looks fully configured but never actually routes anything.
one more field worth setting explicitly: the gateway’s monitor/health-check IP. point it at something that only answers inside the tunnel — your provider’s in-tunnel DNS resolver is usually the right pick — not the provider’s public endpoint over your normal WAN. pinging the public endpoint reports the gateway as “up” even when the tunnel itself is completely dead, which defeats the entire point of having a monitor.
selecting which traffic gets the VPN treatment
two options:
- host alias — explicit IP list. fragile. someone has to remember to keep it updated, and a stale or wrong alias can silently cover far more (or less) than intended. this is what broke my first attempt.
- network membership — match on “this segment’s network” directly. structural. a device either lives there or it doesn’t, no list to drift out of sync.
network membership wins whenever you can dedicate a whole segment to VPN-only traffic. it’s the difference between a rule that can be misconfigured with a typo and one that can’t.
the alias trap
if you’re scoping this to specific devices rather than a whole segment, double-check whatever alias the firewall rule actually references. it’s easy to end up with two aliases that both sound right — one narrow and correct (the handful of hosts you actually meant), one that’s secretly “the entire local subnet,” left over from an earlier draft — with the live rule pointing at the wrong one.
flipping that rule on as-is doesn’t fail loudly. it just quietly routes far more, or far less, traffic than you intended.
worth a five-minute audit before enabling anything: open every alias the rule could plausibly reference and read what it actually resolves to, not what its name implies it resolves to.
clean up leftover config debris
half-finished attempts leave fingerprints. if you’re inheriting this setup from an earlier version of yourself — or from anyone else — check for:
- orphaned floating rules pointing at interfaces that no longer exist, or that don’t match any pattern the current setup actually uses. these don’t do anything except make the ruleset harder to reason about later. delete them.
- outbound NAT, usually on a separate screen from the firewall rules above, and easy to forget entirely. it needs to be enabled and scoped to the VPN-bound network once the interface chain is correct — otherwise traffic can reach the tunnel and still fail to egress properly, in a way that looks like a tunnel problem but isn’t one.
test it properly
- connect a device on the VPN-bound network, check its egress IP against any “what’s my IP” service — should show the VPN exit, not your real WAN IP
- confirm devices outside that network still exit normally
- disable the VPN peer on purpose and confirm the bound device loses connectivity entirely instead of falling back to WAN — that’s the kill switch actually doing its job. skipping this step means you’ve built something that looks right and might not be.
that last test is the one people skip, and it’s the only one that actually proves the “kill switch” part of “kill switch.”